
Wednesday, December 25, 2013
Taking good pictures
I am out of the shop today. Over the Christmas holidays I was showing some pictures of my work to a young man who knows something about photography. He recommended that I make a soft box for lighting. For example, here is a picture of the windmill I made and it doesn't really do the subject justice. So I am going start making a soft box.

Saturday, December 21, 2013


Thursday, December 19, 2013


Wednesday, December 18, 2013
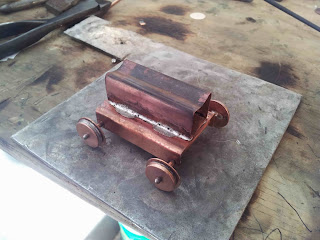
working on front wheel assembly
I worked more on the front wheel assembly today. I added the mount to the body and I am starting to work on the drive cylinders.

 |
| Front wheels in place. I will add the drive cylinders before connecting the wheel assembly to the body. |
 |
| Added drive cylinder mount and starting work on the cylinders. |
Tuesday, December 17, 2013
Making the front wheels
I made the front wheel mount and front wheels today


 |
| A rough view of the front wheels in position |
Monday, December 16, 2013
Rear wheel mount
I made the rear wheel mount bracket today
 |
| Cut out of a copper sheet and formed to shape |
 |
| New bracket mounted to locomotive body. I also added axles and spacers |
 |
| Here is how it looks with the wheels in place |
Saturday, December 14, 2013
Adding counterweight
Now I have four finished rear wheels. Now it's time to add the counterweights to the wheel.
 |
| Carefully cut the counterweight piece out of copper. |
 |
| Here is what the wheels look like after adding counterweight pieces and trimming the edges. |
Thursday, December 12, 2013
Making rear wheels
I am making rear wheels today. I will show all the steps below
 |
| Finished wheel next locomotive body |
 |
| Cut out flange disks and make hubs out of tubing with a cap soldered on |
 |
| Solder hubs to flanges |
 |
| Cut out wheel strip |
 |
| Form into circle after annealing |
 |
| Solder strip into a circle |
 |
| Solder strip onto flange |
 |
| Make spokes by folding over copper strip |
Wednesday, December 11, 2013


Tuesday, December 10, 2013
Starting Out on the Locomotive
I am starting to build the locomotive.
 |
| First I made a pattern out of cardboard for the locomotive body. Once I got the size right I made one out of copper, rolled it up and soldered it. |
 |
| Using a compass and awl I marked what is going to be the front of the body. I am going to try using a center punch on each of those marks to make it look like rivets or bolts. |
Monday, December 9, 2013
My next project is going to be a model of a steam locomotive. This will be a very detailed project. I am going take progress photos through the entire build. Here are a couple pictures of the locomotive that I am going to model. This locomotive is the Union Pacific No. 119. It was one of the two locomotives to meet at Promontory Summit for the golden spike ceremony.


Friday, December 6, 2013
I feel pretty good about working with copper now so I want to try something more complex and detailed. I saw a tractor someone had done in copper and I was intrigued so I looked into antique tractors and decided to model the 1917 Fordson because there are so many pictures and YouTube videos you can see every angle.
Click here to purchase this item on the Etsy site


Click here to purchase this item on the Etsy site


For my next project I bought a plastic model of a Fokker Dr.I Triplane 1:32 scale. I used each part of the model as a pattern for forming the copper.
Click here to purchase this item on the Etsy site


Click here to purchase this item on the Etsy site


Thursday, December 5, 2013
After finishing the lighthouse, I thought of another subject that sits near water, a Dutch windmill. Many Dutch wind mills were used to continually pump water out fields below sea level.
Click here to purchase this item on the Etsy site


Click here to purchase this item on the Etsy site


The next project was a copper lighthouse model. This involved fabricating a copper tube with a taper, a new experience for me. I used brass for the windows to give more definition.
Click here to purchase this item on the Etsy site


Click here to purchase this item on the Etsy site


Subscribe to:
Posts (Atom)